3 Nodes DRBD 8.3 Highly Available Cluster on CentOS / Fedora / RHEL Setup by Ahmad Adnan

3 Nodes DRBD 8.3 Setup by Ahmad Adnan
Three-way replication via DRBD stacking.
Complied by: Ahmad Adnan
Disclaimer:
The following steps are performed on Virtual machines and tested successfully.
It is advised to test first on raw / virtual machines and then in production environment.
We will setup for Three Nodes on High Availability Cluster.
Test Scenario:
We have two virtual machines running on Oracle VirtualBox:
OS: CentOS 5.10
RAM: 512MB
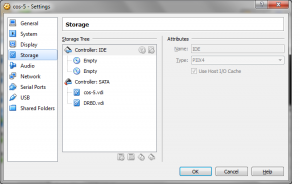
HDD: 2 virtual hard disks (5GB (cos-5.vdi) + 3GB (DRBD.vdi))
===================================================
!!!Tip – Minimal Installation!!!
You can do a minimal install that just requires the first CD by performing the following two steps during the installation:
1. During the category/task selection, deselect all package categories, and choose the Customize now” option at the bottom of screen.
2. During the customized package selection, deselect everything (including the Base group).
Default Swap would be 1GB, you can reduce it by following commands:
!!!Tip – Reducing Swap on an LVM2 Logical Volume!!!
To reduce an LVM2 swap logical volume (assuming /dev/VolGroup00/LogVol01 is the volume you want to extend):
1. Disable swapping for the associated logical volume:
# swapoff -v /dev/VolGroup00/LogVol01
2. Reduce the LVM2 logical volume by 512 MB:
# lvm lvreduce /dev/VolGroup00/LogVol01 -L -512M
3. Format the new swap space:
# mkswap /dev/VolGroup00/LogVol01
4. Enable the extended logical volume:
# swapon -va
5. Test that the logical volume has been reduced properly:
# cat /proc/swaps # free
===================================================
Hard Disk Storage:
===================================================
Network setup is as follows:
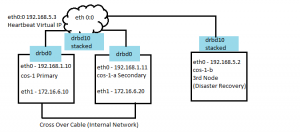
> Three servers: cos-1, cos-1-a, cos-1-b
> cos-1 and cos-1-a are the primary and secondary local nodes
> cos-1-b is the third node which is on a remote network
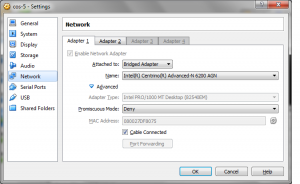
> Both cos-1 and cos-1-a have interfaces on the 192.168.1.x network (eth0) for external connectivity. (Image – cos-5 Network Adapter 1)
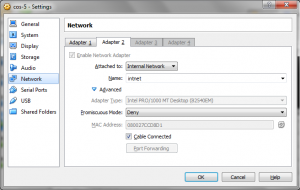
> A crossover link exists on cos-1 and cos-1-a (eth1) for replication using 172.16.6.10 and .20 (Image – cos-5 Network Adapter 2)
> Heartbeat provides a virtual IP of 192.168.5.2 to communicate with the disaster recovery node located in a geographically diverse location
On all three nodes:
cos-1 eth0 192.168.1.10
eth1 172.16.6.10/24—|Static IP
cos-1-a eth0 192.168.1.11
eth1 172.16.6.20/24—|Static IP
cos-1-b eth0 192.168.5.3
eth0
eth1
===================================================
[root@cos-1 ~]# vim /etc/hosts
192.168.1.10 cos-1
192.168.1.11 cos-1-a
save & exit
[root@cos-1-a ~]# ping cos-1
PING cos-1 (192.168.1.10) 56(84) bytes of data.
64 bytes from cos-1 (192.168.1.10): icmp_seq=1 ttl=64 time=4.15 ms
64 bytes from cos-1 (192.168.1.10): icmp_seq=2 ttl=64 time=0.126 ms
64 bytes from cos-1 (192.168.1.10): icmp_seq=3 ttl=64 time=1.88 ms
[root@cos-1 ~]# ping cos-1-a
PING cos-1-a (192.168.1.11) 56(84) bytes of data.
64 bytes from cos-1-a (192.168.1.11): icmp_seq=1 ttl=64 time=1.32 ms
64 bytes from cos-1-a (192.168.1.11): icmp_seq=2 ttl=64 time=0.523 ms
64 bytes from cos-1-a (192.168.1.11): icmp_seq=3 ttl=64 time=1.79 ms
[root@cos-1 ~]# scp /etc/hosts cos-1-a:/etc/hosts
!!! Tip !!!
In case scp command fails and displays as:
[root@cos-1 ~]# scp /etc/hosts cos-1-a:/etc/hosts
bash: scp: command not found
lost connection
The reason is openssh-clients have not been installed on the remote machine. To copy files over scp , openssh-clients needs to be installed on both machines.
[root@cos-1 ~]# rpm -qa | grep openssh-client
openssh-clients-4.3p2-82.el5
If not installed following command will show nothing as below:
[root@cos-1-a ~]# rpm -qa | grep openssh-client
[root@cos-1-a ~]#
Run the following command on each missing node.
[root@cos-1-a ~]# yum install -y openssh-clients
===================================================
For static IP Addresses (eth1) change or add and test as following:
[root@cos-1 ~]# vi /etc/sysconfig/network-scripts/ifcfg-eth1
DEVICE=eth1
BOOTPROTO=static
ONBOOT=yes
HWADDR=
NETWORK=172.16.6.0
NETMASK=255.255.255.0
IPADDR=172.16.6.10
save and exit.
[root@cos-1 ~]# service network restart
Shutting down interface eth0: [ OK ]
Shutting down interface eth1: [ OK ]
Shutting down loopback interface: [ OK ]
Bringing up loopback interface: [ OK ]
Bringing up interface eth0:
Determining IP information for eth0… done.[ OK ]
Bringing up interface eth1: [ OK ]
===================================================
[root@cos-1-a ~]# vi /etc/sysconfig/network-scripts/ifcfg-eth1
DEVICE=eth1
BOOTPROTO=static
ONBOOT=yes
HWADDR=
NETWORK=172.16.6.0
NETMASK=255.255.255.0
IPADDR=172.16.6.20
save and exit.
[root@cos-1a ~]# service network restart
Shutting down interface eth0: [ OK ]
Shutting down interface eth1: [ OK ]
Shutting down loopback interface: [ OK ]
Bringing up loopback interface: [ OK ]
Bringing up interface eth0:
Determining IP information for eth0… done.[ OK ]
Bringing up interface eth1: [ OK ]
[root@cos-1 ~]# ping 172.16.6.20
PING 172.16.6.20 (172.16.6.20) 56(84) bytes of data.
64 bytes from 172.16.6.20: icmp_seq=1 ttl=64 time=0.638 ms
64 bytes from 172.16.6.20: icmp_seq=2 ttl=64 time=1.30 ms
64 bytes from 172.16.6.20: icmp_seq=3 ttl=64 time=0.489 ms
===================================================
[root@cos-1-b ~]# vi /etc/sysconfig/network-scripts/ifcfg-eth0
DEVICE=eth0
BOOTPROTO=static
ONBOOT=yes
HWADDR=
DHCP_HOSTNAME=cos-1-b
NETWORK=192.168.5.0
NETMASK=255.255.255.0
IPADDR=192.168.5.3
===================================================
Stop unwanted services on both servers
[root@cos-1 ~]# /etc/init/sendmail stop
[root@cos-1 ~]# chkconfig -–level 235 sendmail off
[root@cos-1 ~]# iptables -F
[root@cos-1 ~]# service iptables save
[root@cos-1-a ~]# /etc/init/sendmail stop
[root@cos-1-a ~]# chkconfig -–level 235 sendmail off
[root@cos-1-a ~]# iptables -F
[root@cos-1-a ~]# service iptables save
[root@cos-1-b ~]# /etc/init/sendmail stop
[root@cos-1-b ~]# chkconfig –level 235 sendmail off
[root@cos-1-b ~]# iptables -F
[root@cos-1-b ~]# service iptables save
=========================================
NTP Configuration
=========================================
[root@cos-1 ~]# yum install ntp -y
[root@cos-1 ~]# vi /etc/ntp.conf
Change as following.
### Commented By Ahmad Adnan on 14th of June 2014 ###
#server 0.centos.pool.ntp.org
#server 1.centos.pool.ntp.org
#server 2.centos.pool.ntp.org
server 127.127.1.0 # local clock
#fudge 127.127.1.0 stratum 10
# driftfile /var/lib/ntp/drift
keys /etc/ntp/keys
save & quit.
[root@cos-1 ~]# /etc/init.d/ntpd start
[root@cos-1 ~]# chkconfig –level 235 ntpd on
======================================
[root@cos-1-a ~]# yum install ntp -y
[root@cos-1-a ~]# vi /etc/ntp.conf
server 192.168.1.10 ### add this line on second server ###
#server 0.centos.pool.ntp.org
#server 1.centos.pool.ntp.org
#server 2.centos.pool.ntp.org
#server 127.127.1.0 # local clock ##### #####
#fudge 127.127.1.0 stratum 10
driftfile /var/lib/ntp/drift
keys /etc/ntp/keys
save & exit
[root@cos-1-a ~]# /etc/init.d/ntpd start
[root@cos-1-a ~]# chkconfig –level 235 ntpd on
======================================
[root@cos-1-b ~]# yum install ntp -y
[root@cos-1-b ~]# vi /etc/ntp.conf
server 192.168.5.2 ### add this line on second server ###
#server 0.centos.pool.ntp.org
#server 1.centos.pool.ntp.org
#server 2.centos.pool.ntp.org
#server 127.127.1.0 # local clock ##### #####
#fudge 127.127.1.0 stratum 10
driftfile /var/lib/ntp/drift
keys /etc/ntp/keys
save & exit
[root@cos-1-b ~]# /etc/init.d/ntpd start
[root@cos-1-b ~]# chkconfig –level 235 ntpd on
====================================
[root@cos-1-a ~]# ntpdate -u 192.168.1.10
[root@cos-1-a ~]# watch ntpq -p -n
[root@cos-1-b ~]# ntpdate -u 192.168.5.2
[root@cos-1-b ~]# watch ntpq -p -n
[root@cos-1 ~]# watch ntpq -p -n
=========================================
Partition setup on all Servers.
=========================================
Partition setup on all server identical same with fdisk.
We have 3GB disks on both servers and create LVM partition type.
Note: Create same partitions on all servers identical as below:
[root@cos-1 ~]# fdisk /dev/sd
sda sda1 sda2 sdb sdb1
[root@cos-1 ~]# fdisk /dev/sdb1
Command (m for help): p
Disk /dev/sdb1: 3221 MB, 3221225472 bytes
255 heads, 63 sectors/track, 391 cylinders
Units = cylinders of 16065 * 512 = 8225280 bytes
Device Boot Start End Blocks Id System
/dev/sdb1 1 522 4192933+ 8e Linux LVM
Command (m for help): d
Selected partition 1
Command (m for help): n
Command action
e extended
p primary partition (1-4)
p
Partition number (1-4): 1
First cylinder (1-391, default 1):
Using default value 1
Last cylinder or +size or +sizeM or +sizeK (1-391, default 391): 391
Command (m for help): p
Disk /dev/sdb: 3221 MB, 3221225472 bytes
255 heads, 63 sectors/track, 391 cylinders
Units = cylinders of 16065 * 512 = 8225280 bytes
Device Boot Start End Blocks Id System
/dev/sdb1 1 366 2939863+ 83 Linux
Command (m for help): t
Selected partition 1
Hex code (type L to list codes): 8e
Changed system type of partition 1 to 8e (Linux LVM)
Command (m for help): p
Disk /dev/sdb: 3221 MB, 3221225472 bytes
255 heads, 63 sectors/track, 391 cylinders
Units = cylinders of 16065 * 512 = 8225280 bytes
Device Boot Start End Blocks Id System
/dev/sdb1 1 366 2939863+ 8e Linux
Command (m for help): w
[root@cos-1 ~]# partprobe
=======================================================
Create Physical Volume for LVM this is second step for LVM partition.
Note: Create LVM on all servers identical same as below:
[root@cos-1 ~]# pvcreate /dev/sdb1
Create Volume Group with this command
[root@cos-1 ~]# vgcreate vgdrbd /dev/sdb1
Create Logical volume partition
[root@cos-1 ~]# lvcreate -n lvdrbd /dev/mapper/vgdrbd -L +293M
Rounding up size to full physical extent 296.00 MB
Logical volume “lvdrbd” created
======================================================
DRBD (Distributed Replicated Block Device)
======================================================
Note: Install DRBD on all 3 servers
[root@cos-1 ~]# yum install -y drbd83 kmod-drbd83
Installed:
kmod-drbd83.i686 0:8.3.15-3.el5.centos
drbd83.i386 0:8.3.15-2.el5.centos
Complete!
[root@cos-1 ~]# chkconfig –level 235 drbd on
[root@cos-1 ~]# modprobe drbd
[root@cos-1 ~]# cat /proc/drbd
version: 8.3.15 (api:88/proto:86-97)
GIT-hash: 0ce4d235fc02b5c53c1c52c53433d11a694eab8c build by
[email protected], 2013-03-27 16:04:08
==========================================
Heartbeat Installation
===========================================
Note: Setting up a third node entails stacking DRBD on top of DRBD. A virtual IP is needed for the third node to connect to, for this we will set up a simple Heartbeat v1 configuration. This section will only be done on cos-1 and cos-1-a.
[root@cos-1 ~]# yum install -y heartbeat
Installed:
heartbeat.i386 0:2.1.3-3.el5.centos
Complete!
[root@cos-1 ~]# chkconfig –level 235 heartbeat on
==========================================
Heartbeat Configuration
===========================================
[root@cos-1 ~]# vi /etc/ha.d/authkeys
auth 1
1 sha1 pa$$
save and exit.
[root@cos-1 ~]# chmod 600 /etc/ha.d/authkeys
[root@cos-1 ~]# scp /etc/ha.d/authkeys cos-1-a:/etc/ha.d/authkeys
[root@cos-1 ha.d]# vi /etc/ha.d/ha.cf
debugfile /var/log/ha-debug
logfile /var/log/ha-log
logfacility local0
keepalive 1
deadtime 10
warntime 5
initdead 60
udpport 694
bcast eth1
ucast eth1 172.16.6.20
auto_failback off
node cos-1
node cos-1-a
save & exit.
[root@cos-1-a ha.d]# vi /etc/ha.d/ha.cf
debugfile /var/log/ha-debug
logfile /var/log/ha-log
logfacility local0
keepalive 1
deadtime 10
warntime 5
initdead 60
udpport 694
bcast eth1
ucast eth1 172.16.6.10
auto_failback off
node cos-1
node cos-1-a
save & exit.
[root@cos-1 ~]# vi /etc/ha.d/haresources
cos-1 IPaddr::192.168.5.2/24/eth0
save and exit.
[root@cos-1 ~]# scp /etc/ha.d/haresources cos-1-a:/etc/ha.d/haresources
Start the heartbeat service on both servers to bring up the virtual IP:
[root@cos-1 ~]# /etc/init.d/heartbeat start
logd is already running
Starting High-Availability services:
2014/05/31_22:56:56 INFO: Resource is stopped [ OK ]
[root@cos-1-a ~]# /etc/init.d/heartbeat start
Starting High-Availability services:
2014/05/31_22:57:15 INFO: Resource is stopped [ OK ]
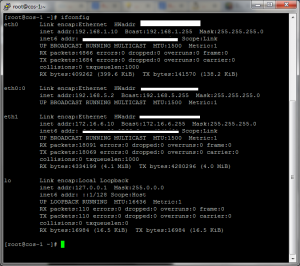
Heartbeat will bring up the new interface (eth0:0).
Note: It may take heartbeat up to one minute to bring the interface up.
[root@cos-1 ~]# ifconfig
3rd Node is also up now and responding:
[root@cos-1 ~]# ping 192.168.5.3
====================================================
DRBD Configuration
====================================================
We will first test DRBD connection in Primary and Secondary nodes and once tested we will proceed for 3rd node stacked on Backup. Configuration for DRBD is done via the drbd.conf file. This needs to be the same on all 3 nodes (cos-1, cos-1-a, cos-1-b).
[root@cos-1 ~]# vi /etc/drbd.conf
resource drbd-lower {
protocol C;
net {
shared-secret “PASSWORD”;
}
syncer {
rate 12M;
}
on cos-1 {
device /dev/drbd0;
disk /dev/vgdrbd/lvdrbd;
address 172.16.6.10:7788;
meta-disk internal;
}
on cos-1-a {
device /dev/drbd0;
disk /dev/vgdrbd/lvdrbd;
address 172.16.6.20:7788;
meta-disk internal;
}
}
save and exit.
[root@cos-1 ~]# scp /etc/drbd.conf cos-1-a:/etc/drbd.conf
[root@cos-1 ~]# drbdadm create-md drbd-lower
you are the 17936th user to install this version
Writing meta data…
initializing activity log
NOT initialized bitmap
New drbd meta data block successfully created.
success
[root@cos-1 ~]# /etc/init.d/drbd start
[root@cos-1 ~]# drbdadm — –overwrite-data-of-peer primary drbd-lower
[root@cos-1 ~]# cat /proc/drbd
version: 8.3.15 (api:88/proto:86-97)
0: cs:Connected ro:Primary/Secondary ds:Diskless/UpToDate C r—–
ns:17 nr:35 dw:0 dr:0 al:0 bm:0 lo:0 pe:0 ua:0 ap:0 ep:1 wo:b oos:0
===================================================
[root@cos-1-a ~]# drbdadm create-md drbd-lower
[root@cos-1-a ~]# /etc/init.d/drbd start
[root@cos-1-a ~]# cat /proc/drbd
version: 8.3.15 (api:88/proto:86-97)
0: cs:Connected ro:Secondary/Primary ds:UpToDate/UpToDate C r—–
ns:0 nr:303056 dw:303056 dr:0 al:0 bm:19 lo:0 pe:0 ua:0 ap:0 ep:1 wo:b oos:0
==================================================
[root@cos-1 ~]# vi /etc/drbd.conf
###add the following ###
resource drbd-upper {
protocol A;
syncer {
after drbd-lower;
rate 12M;
al-extents 513;
}
net {
shared-secret “PASSWORD”;
}
stacked-on-top-of drbd-lower {
device /dev/drbd10;
address 192.168.5.2:7788; # IP provided by Heartbeat
}
on cos-1-b {
device /dev/drbd10;
disk /dev/vgdrbd/lvdrbd;
address 192.168.5.3:7788; # Public IP of the backup node
meta-disk internal;
}
}
save & exit.
[root@cos-1 ~]# drbdadm –stacked create-md drbd-upper
.
..
…
You want me to create a v08 style flexible-size internal meta data block.
There appears to be a v08 flexible-size internal meta data block
already in place on /dev/drbd0 at byte offset 310325248
Do you really want to overwrite the existing v08 meta-data?
[need to type ‘yes’ to confirm] yes
Writing meta data…
initializing activity log
NOT initialized bitmap
New drbd meta data block successfully created.
[root@cos-1-b ~]# drbdadm create-md drbd-upper
[root@cos-1 ~]# drbdadm –stacked adjust drbd-upper
[root@cos-1-b ~]# drbdadm adjust drbd-upper
[root@cos-1 ~]# drbdadm –stacked — –overwrite-data-of-peer primary drbd-upper
[root@cos-1 ~]# mkfs.ext3 /dev/drbd10
mke2fs 1.39 (29-May-2006)
Filesystem label=
OS type: Linux
Block size=1024 (log=0)
Fragment size=1024 (log=0)
75776 inodes, 303008 blocks
15150 blocks (5.00%) reserved for the super user
First data block=1
Maximum filesystem blocks=67633152
37 block groups
8192 blocks per group, 8192 fragments per group
2048 inodes per group
Superblock backups stored on blocks:
8193, 24577, 40961, 57345, 73729, 204801, 221185
Writing inode tables: done
Creating journal (8192 blocks): done
Writing superblocks and filesystem accounting information: done
This filesystem will be automatically checked every 39 mounts or
180 days, whichever comes first. Use tune2fs -c or -i to override.
[root@cos-1 ~]# mkdir /drbd
[root@cos-1 ~]# mount /dev/drbd10 /drbd/
[root@cos-1 ~]# df -h
Filesystem Size Used Avail Use% Mounted on
/dev/mapper/VolGroup00-LogVol00 3.8G 790M 2.8G 22% /
/dev/sda1 99M 19M 76M 20% /boot
tmpfs 252M 0 252M 0% /dev/shm
/dev/drbd10 287M 11M 262M 4% /drbd
[root@cos-1 ~]# umount /drbd =====================================================
Revising /etc/ha.d/haresources for 3rd node.
=====================================================
[root@cos-1 ~]# vi /etc/ha.d/haresources
cos-1 IPaddr::192.168.5.2/24/eth0 drbdupper::drbd-upper Filesystem::/dev/drbd10::/drbd::ext3
### Above is 1 line ###
[root@cos-2 ~]# /etc/init.d/heartbeat stop
[root@cos-1 ~]# /etc/init.d/heartbeat stop
[root@cos-1 ~]# /etc/init.d/heartbeat start
[root@cos-2 ~]# /etc/init.d/heartbeat start
[root@cos-1 ~]# cat /proc/drbd
version: 8.3.15 (api:88/proto:86-97)
0: cs:Connected ro:Primary/Secondary ds:UpToDate/UpToDate C r—–
ns:303216 nr:0 dw:160 dr:527029 al:1 bm:19 lo:0 pe:0 ua:0 ap:0 ep:1 wo:b oos:0
10: cs:SyncSource ro:Primary/Secondary ds:UpToDate/Inconsistent A r—n-
ns:222632 nr:0 dw:0 dr:222720 al:0 bm:13 lo:0 pe:7 ua:1 ap:0 ep:1 wo:b oos:81184
[=============>……] sync’ed: 74.4% (81184/303008)K
finish: 0:00:06 speed: 13,048 (13,048) K/sec
[root@cos-1 ~]# cat /proc/drbd
version: 8.3.15 (api:88/proto:86-97)
0: cs:Connected ro:Primary/Secondary ds:UpToDate/UpToDate C r—–
ns:303240 nr:0 dw:184 dr:607317 al:1 bm:19 lo:0 pe:0 ua:0 ap:0 ep:1 wo:b oos:0
10: cs:Connected ro:Primary/Secondary ds:UpToDate/UpToDate A r—–
ns:303008 nr:0 dw:0 dr:303008 al:0 bm:19 lo:0 pe:0 ua:0 ap:0 ep:1 wo:b oos:0
[root@cos-1-b ~]# cat /proc/drbd
version: 8.3.15 (api:88/proto:86-97)
10: cs:Connected ro:Secondary/Primary ds:UpToDate/UpToDate A r—–
ns:0 nr:321296 dw:321296 dr:0 al:0 bm:20 lo:0 pe:0 ua:0 ap:0 ep:1 wo:f oos:0
=====================================================
To test the second node cos-1-a =====================================================
[root@cos-1 ~]# service heartbeat stop
### wait for some time ###
[root@cos-1-a ~]# cat /proc/drbd
version: 8.3.15 (api:88/proto:86-97)
0: cs:Connected ro:Primary/Secondary ds:UpToDate/UpToDate C r—–
ns:16 nr:321576 dw:321592 dr:47 al:2 bm:19 lo:0 pe:0 ua:0 ap:0 ep:1 wo:f oos:0
10: cs:Connected ro:Primary/Secondary ds:UpToDate/UpToDate A r—–
ns:17 nr:0 dw:1 dr:21 al:1 bm:1 lo:0 pe:0 ua:0 ap:0 ep:1 wo:b oos:0
[root@cos-1-a ~]# ifconfig
eth0 Link encap:Ethernet HWaddr
inet addr:192.168.1.11 Bcast:192.168.1.255 Mask:255.255.255.0
inet6 addr: fe80::a00:27ff:fea4:303d/64 Scope:Link
UP BROADCAST RUNNING MULTICAST MTU:1500 Metric:1
RX packets:4472 errors:0 dropped:0 overruns:0 frame:0
TX packets:1426 errors:0 dropped:0 overruns:0 carrier:0
collisions:0 txqueuelen:1000
RX bytes:369227 (360.5 KiB) TX bytes:184362 (180.0 KiB)
eth0:0 Link encap:Ethernet HWaddr
inet addr:192.168.5.2 Bcast:192.168.5.255 Mask:255.255.255.0
UP BROADCAST RUNNING MULTICAST MTU:1500 Metric:1
eth1 Link encap:Ethernet HWaddr
inet addr:172.16.6.20 Bcast:172.16.6.255 Mask:255.255.255.0
inet6 addr: fe80::a00:27ff:fe8a:fbda/64 Scope:Link
UP BROADCAST RUNNING MULTICAST MTU:1500 Metric:1
RX packets:274528 errors:0 dropped:0 overruns:0 frame:0
TX packets:76318 errors:0 dropped:0 overruns:0 carrier:0
collisions:0 txqueuelen:1000
RX bytes:371533180 (354.3 MiB) TX bytes:10374515 (9.8 MiB)
[root@cos-1-a ~]# ls /drbd/
123.file copy.file lost+found test.file
[root@cos-1 ~]# cat /proc/drbd
version: 8.3.15 (api:88/proto:86-97)
0: cs:Connected ro:Secondary/Primary ds:UpToDate/UpToDate C r—–
ns:321576 nr:21 dw:18541 dr:620903 al:39 bm:19 lo:0 pe:0 ua:0 ap:0 ep:1 wo:f oos:0
10: cs:Unconfigured
=======================================================
To access the data on 3rd node if 1st and 2nd both nodes are crashed:
=======================================================
Please note, data/files in /drbd directory will be only available on Primary device. Which means if cos-1 was first active then it will have the files and Virtual IP (eth0:0) but in case cos-1 is crashed then cos-1-a will upgrade from Secondary to Primary and same way data in /drbd and Virtual IP will be available in cos-1-a.
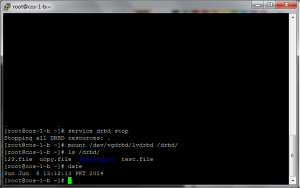
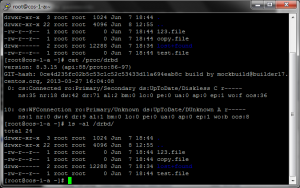
About 3rd Disaster Recovery node, it will always remain Secondary, because it is always wait for either cos-1 or cos-1-a to be Active and start replication/A-synchronization. If Data is needed to be extracted from Disaster Recovery i.e. 3rd node then Simply stop the drbd service on 3rd node, and mount the relevant device to access the data as depicted below:
You can compare the same data is available on cos-1-a which is already present in 3rd Disaster Recovery node. While you can easily see from cat /proc/drbd that DRBD10 node is down:
10: cs:WFConnection ro:Primary/Unknown ds:UpToDate/DUnknown A r—–
ns:1 nr:0 dw:6 dr:9 al:1 bm:0 lo:0 pe:0 ua:0 ap:0 ep:1 wo:b oos:8
Please see the image below:
Everything is Done, AlhumduLILLAH I RUBB ul Al’amin.
***************************************************************************
Troubleshooting: In Case drbdadm –stacked create-md drbd-upper is Refused as following:
***************************************************************************
[root@cos-1 ~]# drbdadm –stacked create-md drbd-upper
md_offset 310325248
al_offset 310292480
bm_offset 310280192
Found ext3 filesystem
303056 kB data area apparently used
303008 kB left usable by current configuration
Device size would be truncated, which
would corrupt data and result in
‘access beyond end of device’ errors.
You need to either
* use external meta data (recommended)
* shrink that filesystem first
* zero out the device (destroy the filesystem)
Operation refused.
Command ‘drbdmeta 10 v08 /dev/drbd0 internal create-md’ terminated with exit
code 40
drbdadm create-md drbd-upper: exited with code 40
[root@cos-1 ~]# dd if=/dev/zero of=/dev/sdb1 bs=1M count=128
128+0 records in
128+0 records out
134217728 bytes (134 MB) copied, 0.305571 seconds, 439 MB/s
[root@cos-1 ~]# drbdadm –stacked create-md drbd-upper
Writing meta data…
initializing activity log
NOT initialized bitmap
New drbd meta data block successfully created.
–== Creating metadata ==–
As with nodes, we count the total number of devices mirrored by DRBD at http://usage.drbd.org.
The counter works anonymously. It creates a random number to identify
the device and sends that random number, along with the kernel and
DRBD version, to usage.drbd.org.
* If you wish to opt out entirely, simply enter ‘no’.
* To continue, just press [RETURN]
success



Comments are closed.